Cameras???
Plan of Attack
Cameras have 4 main settings that affect the look of a photo - but how do they work and what do they mean?
Over Christmas, I got a new Camera - an EOS R10 with a pair of lenses, and I’ll be using it to explain what the different settings do. The sensor is really good and it spits out incredibly high quality images. For the purposes of demonstration, I’ll be using my cat on a beanbag as the purrfect subject. Unless otherwise specified, I’ll be using a 50mm lens.
What are the main settings?#
Here, I’ll only be talking about the main mechanical settings - nothing really artistic like profiles, composition or how to get your control ring to control ISO.
In my opinion, there are 4 main mechanical settings:
- Aperture
- Shutter Speed
- ISO
- Focal Length
However, to understand the effects of each of those changes (in my humble opinion) you need to actually know how a camera takes a photo, even if only at a very basic level.
So how do we go from photons to pixels?#
Firstly - here, I’ll just be talking about digital cameras - although the main difference is that for film you’d swap ‘sensor’ for ‘film’ and add steps for development. ISO is also called Speed for film and comes factory set in the particular roll of film.
Light is emitted from sources in the form of photons - each photon can act like a wave, and here we’ll be focusing on that part1. Every wave has a wavelength, which is a measure of the distance between two peaks of that wave. When light hits the rods and cones in your eyes, the colours come from the different wavelengths interacting differently with your eyes - for example we see red at about 700nm, green at about 525nm and blue at about 425nm2. The only principle difference between radio waves, microwaves and visible light is the wavelength - our eyes only see what we call visible light, but some animals see far more than we can.
Most light sources emit a variety of wavelengths (white is an equal mix of the whole visible spectrum), and as light bounces around some of those surfaces some of the wavelengths get absorbed. Eventually, only the wavelengths that didn’t get absorbed (or just spread elsewhere) reach our eyes and that influences what colour we see. When I see the green cover for my pad of paper, that tells me that the ink absorbs every wavelength apart from the ones that correspond to green.
The same way that light can hit your eyes, it can also hit a camera sensor - they use complicated electronics to detect the different wavelengths of light and their different quantities to produce binary data that can then be displayed on our screens as pixels in photos.
However, you never see anyone ever take photos with sensors alone and they always use a lens on top - why? So, it’s partially to protect the sensor which is the most crucial part of the camera - if I scratch the dial to change modes, nobody cares but a broken sensor will ruin a camera body. The other reason is to help control the light and ensure it enters the sensor perpendicularly. Normally, the light entering a sensor might come from all different kinds of angles and the lens just makes them all straight using glass. The lens also controls Aperture, but we’ll get there when we get there.
To actually take a photo, a digital camera just resets a few counters and then waits for a specified amount of time for the sensor to accumulate data and then it spits it all out. Simple!
The Settings Themselves#
Now, after that fun physics detour, time for the settings themselves.
Shutter Speed#
The Shutter Speed is probably the simplest to understand - the specified amount of time that the sensor waits is the shutter speed. So, technically it should be the Shutter Time or the Exposure Time or something because it doesn’t measure distance, but I don’t make the rules. Being serious, this might have come from film, where you could qualify the distance as the width of the film, but I’m not a photography etymologist.
Shutter Speed is usually referred to as 1/x where x is some nice number, but for longer exposures it’ll say the number of seconds. Obviously, if you have a longer shutter speed then you’ll get more light but there’s a cost! If you set the shutter speed to be too high, then you have to start worrying about whether your camera will move during the exposure. If we take this back to the photons, in a shorter exposure all of the photons hitting the specific spots on the sensor will have taken similar paths, but if you’re taking a photo of usain bolt over a second, then the photons hitting the same spots on the sensor are taking very different paths which leads to absorption of different wavelengths and so different colours. It’s blurry, to put it simply.
Here, I’ve got two photos of my cat (ISO 2000, F1.8) - one taken at 1/20 and one at 1/80.

If we assume that my hand stayed relatively still, we can see that the second photo is far blurrier than the second. However, in the second photo we can actually see the cat which is a plus.
Clearly, we need another way to change the light.
Aperture#
Inside the lens, there are ‘blades’ which form rotate in to the centre to form a circle. The Aperture measures how close they are together. Counter-intuitively, a larger aperture means a smaller number.
Here, I’ve got 3 photos of my lens taken at varying apertures from my phone.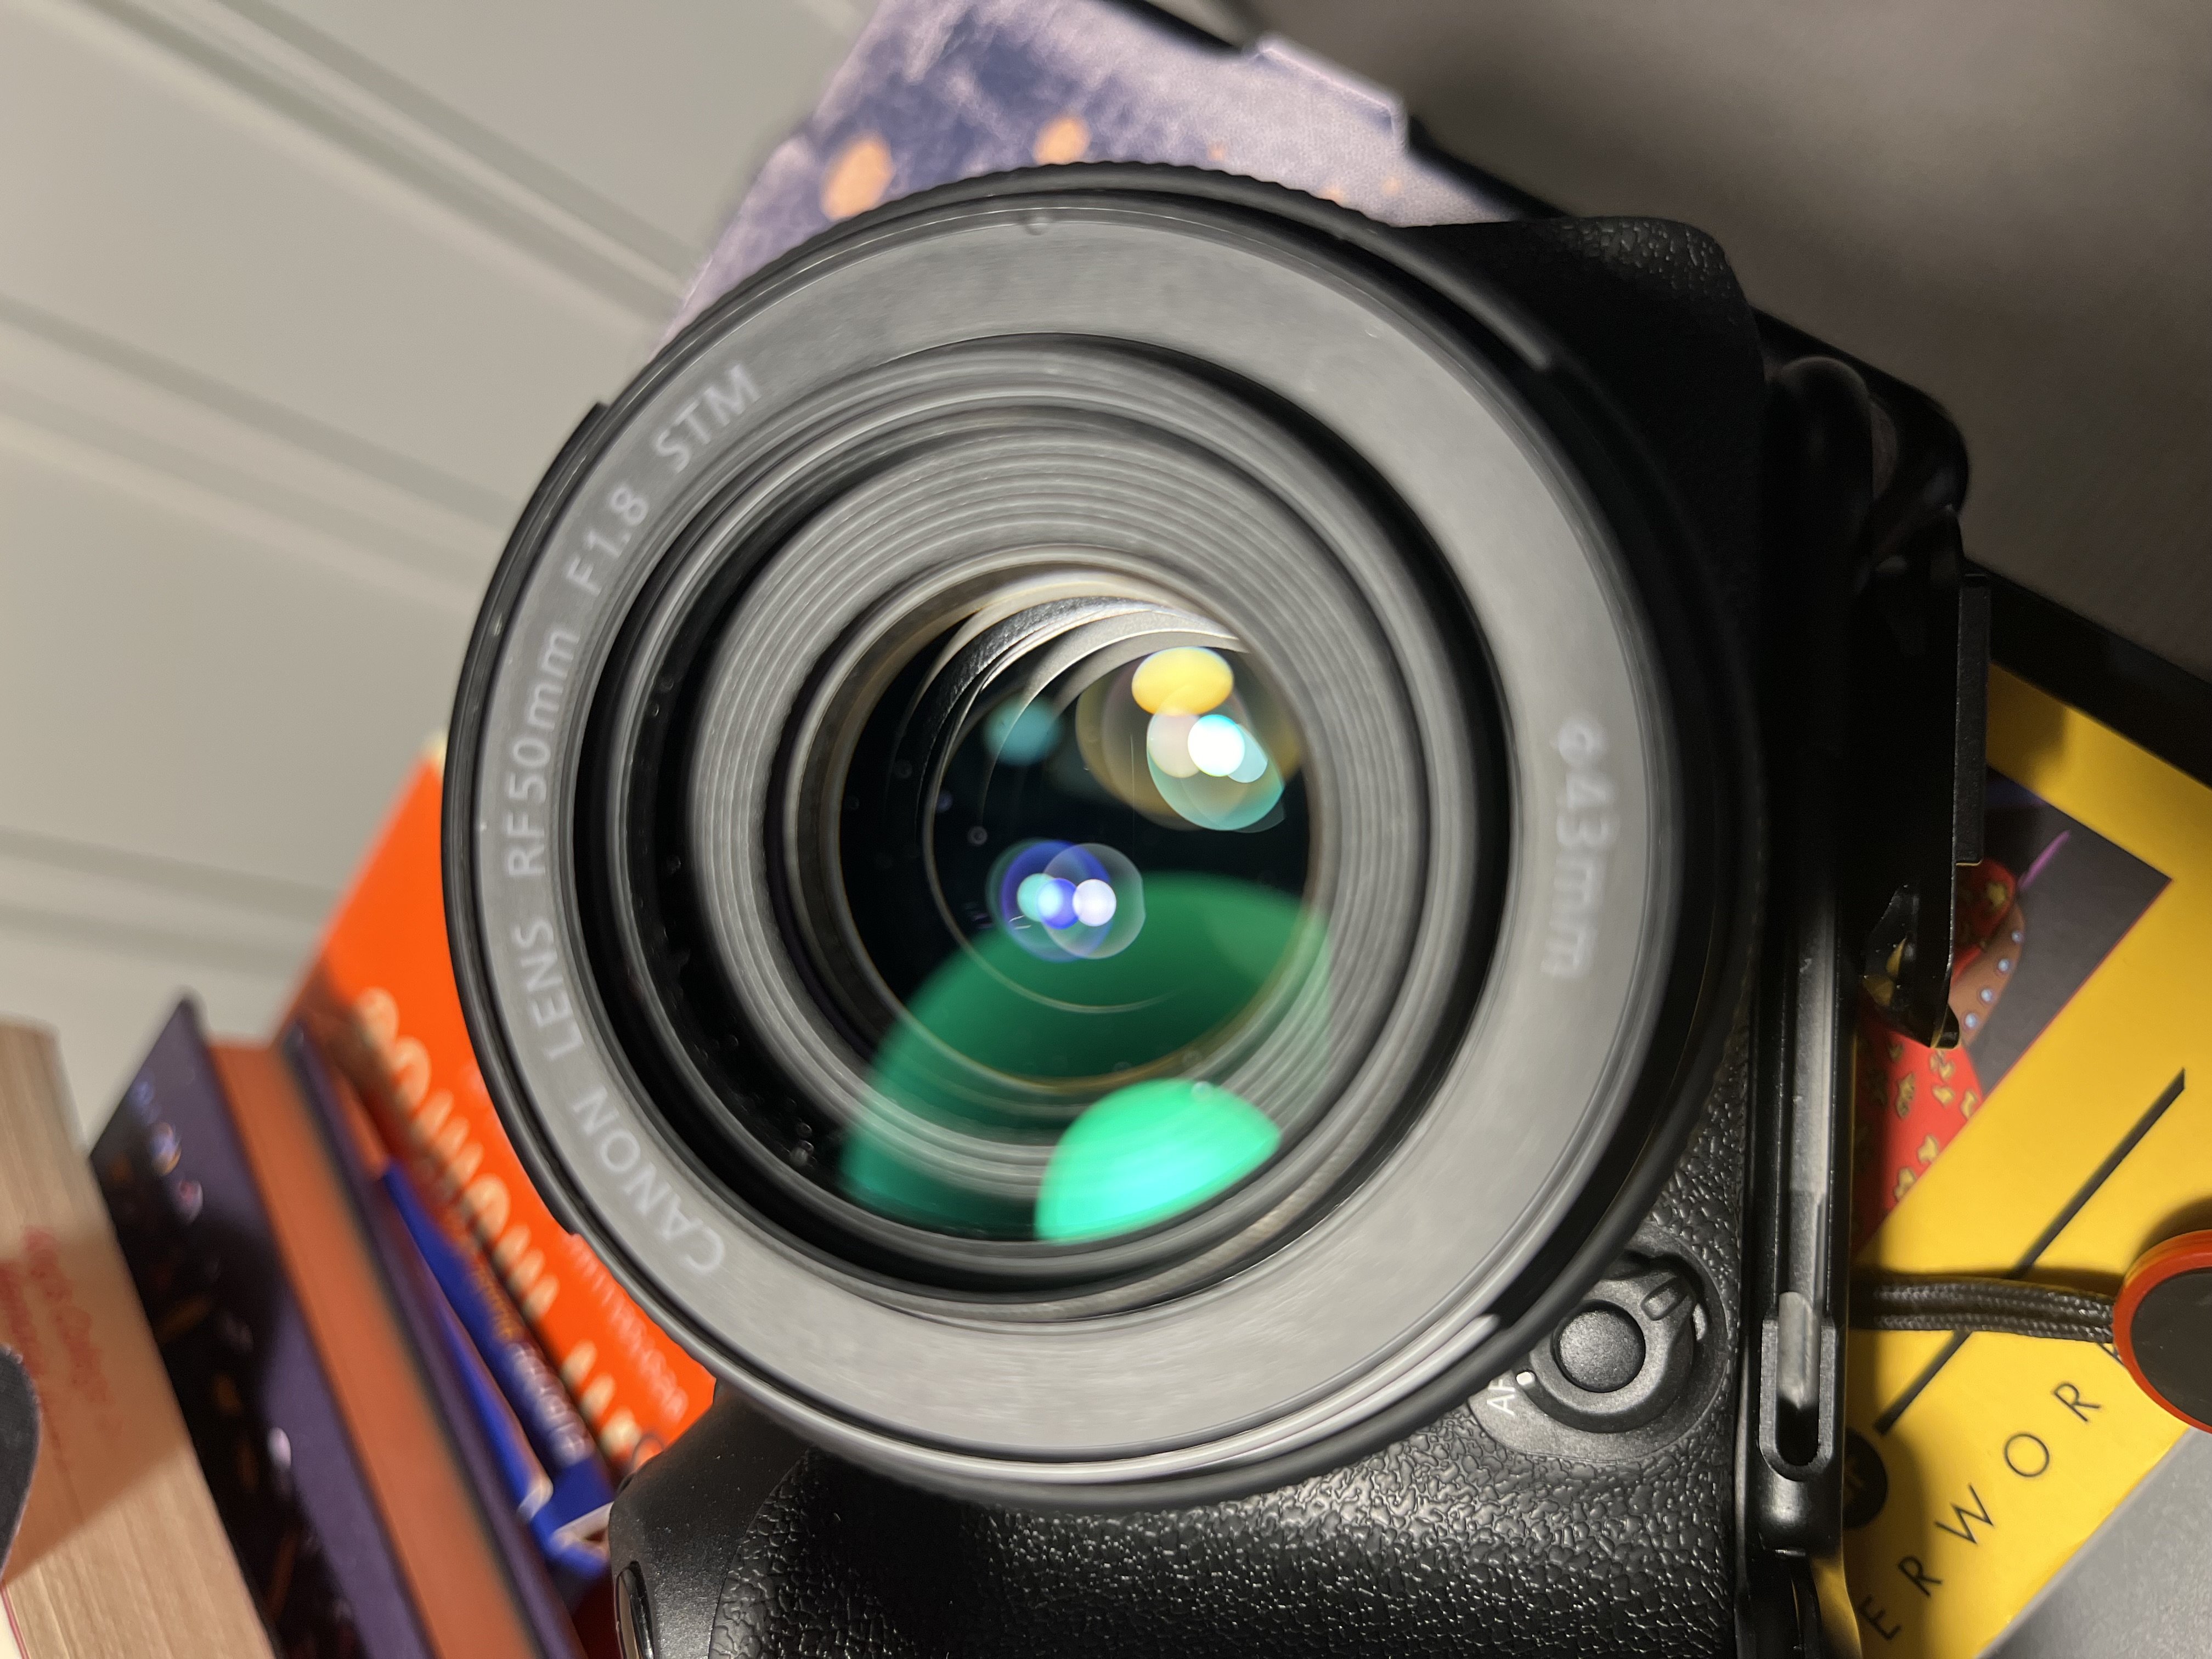
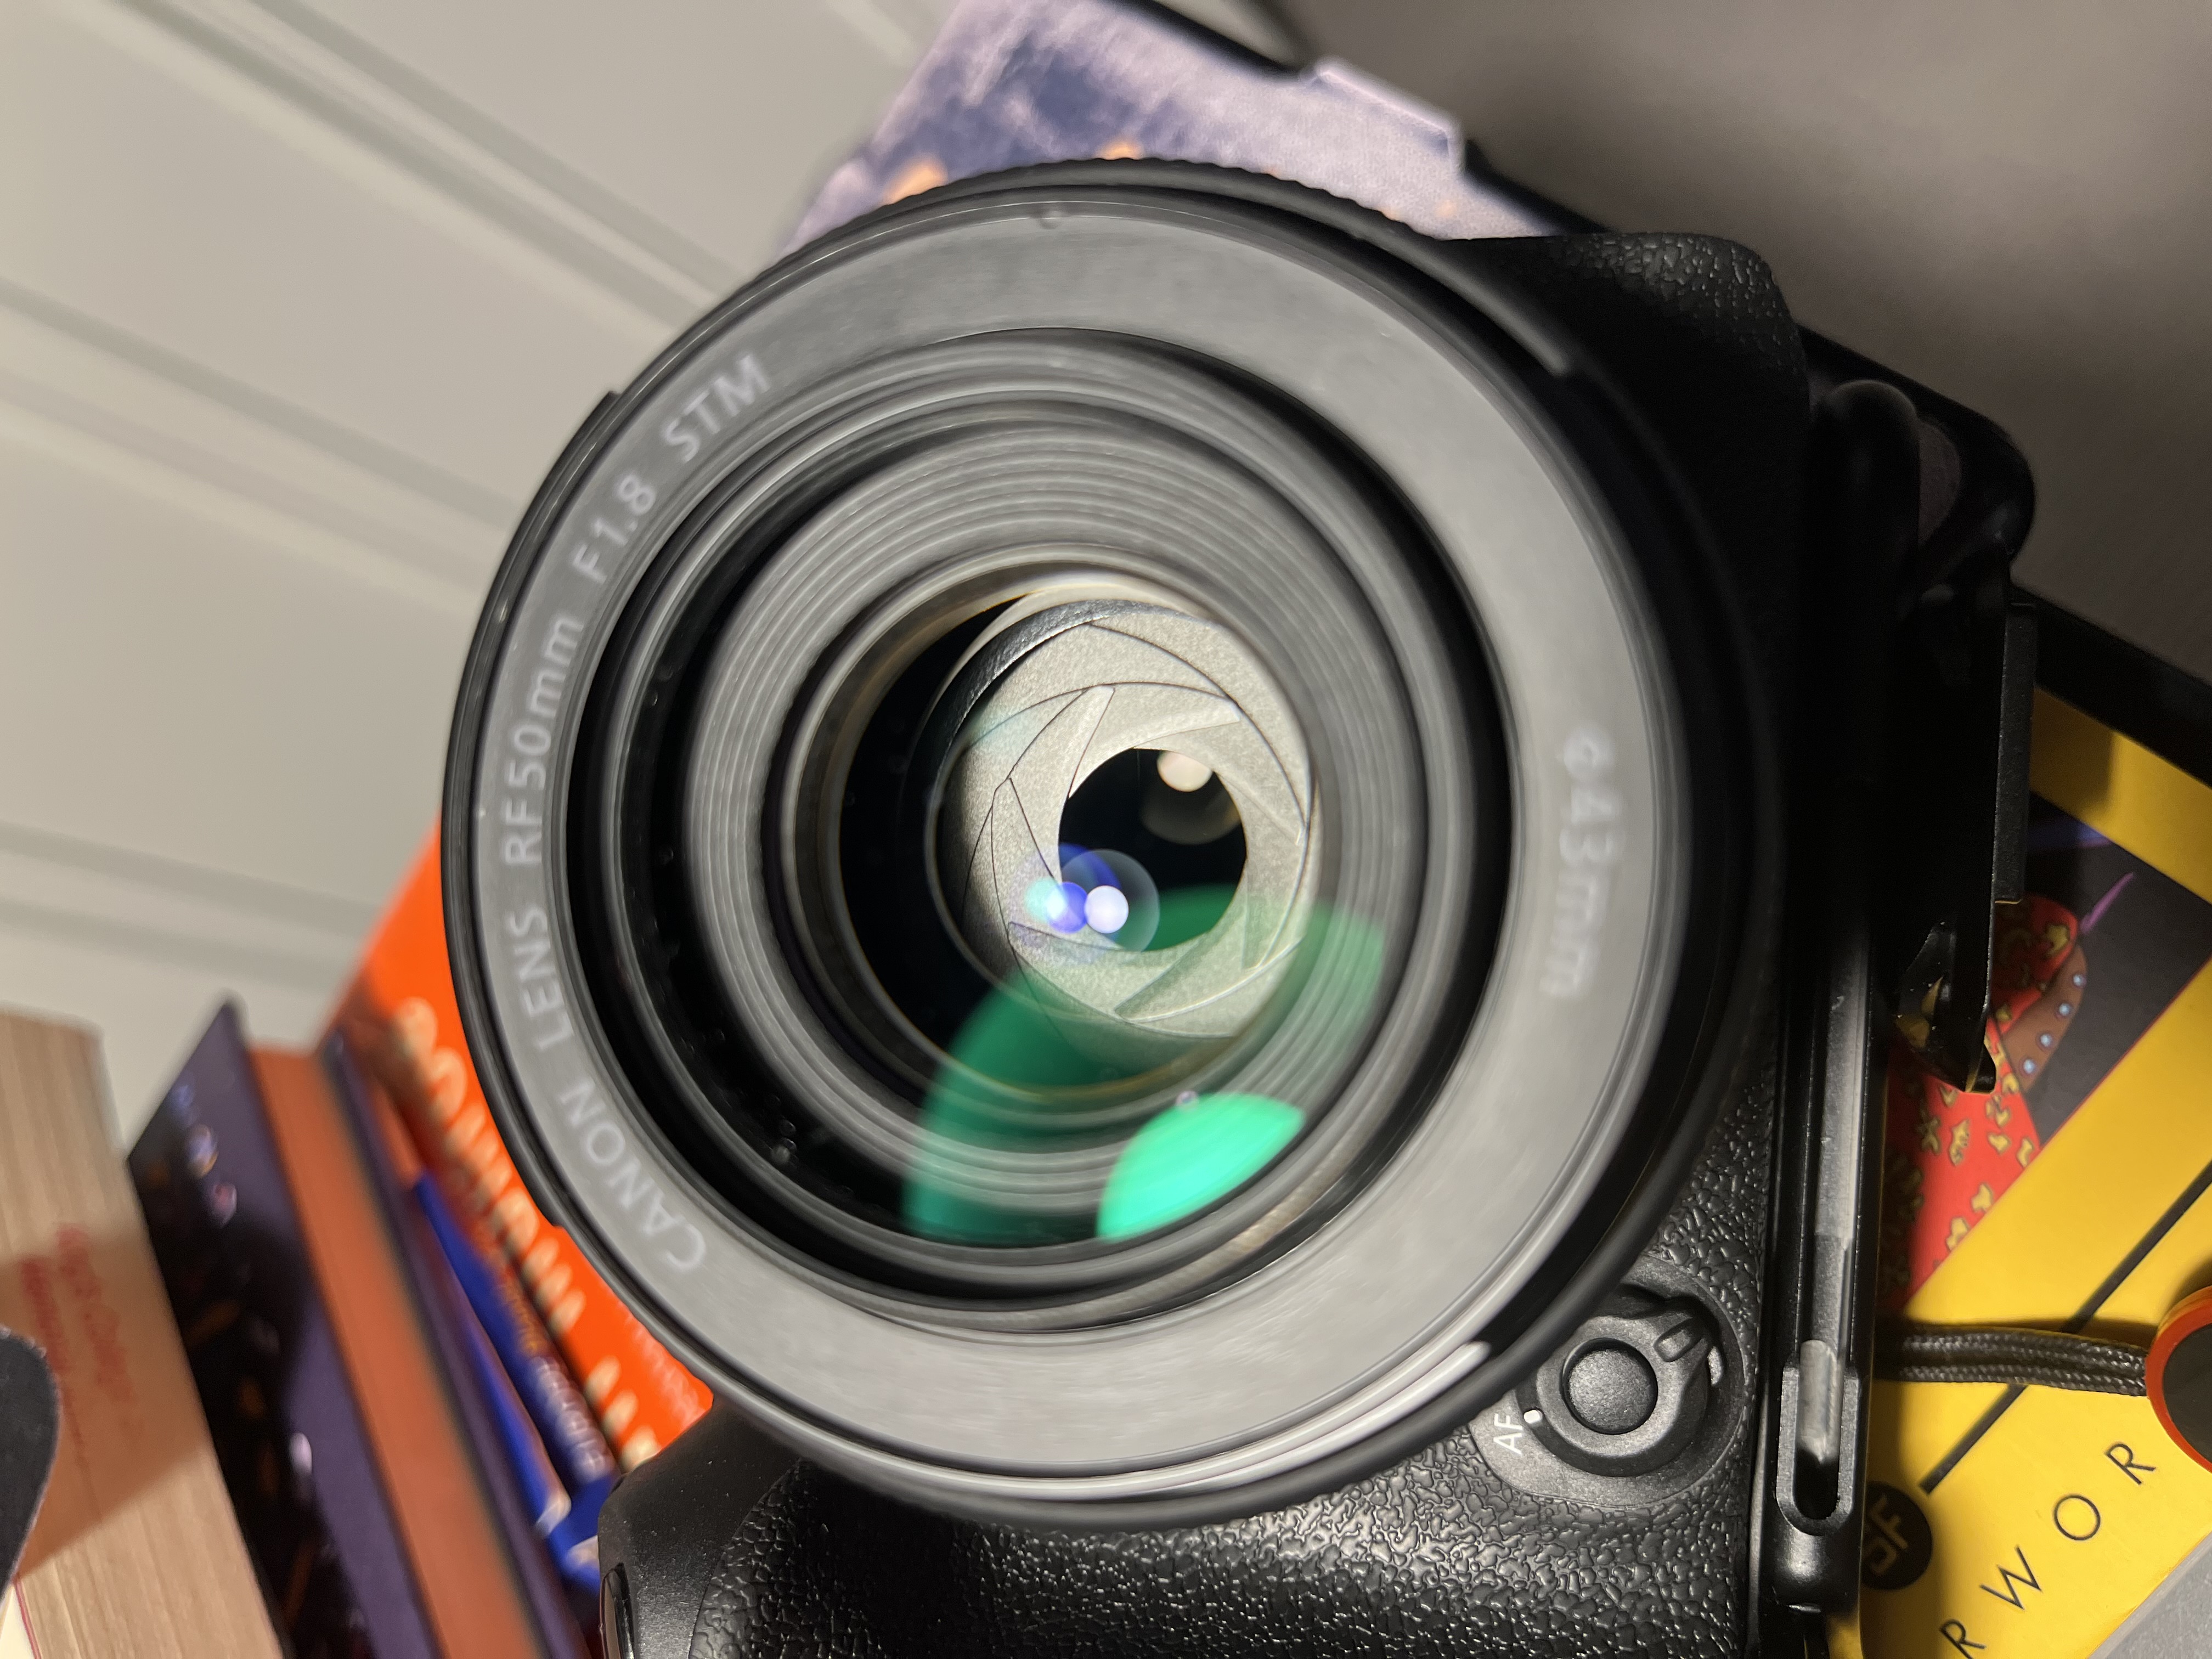
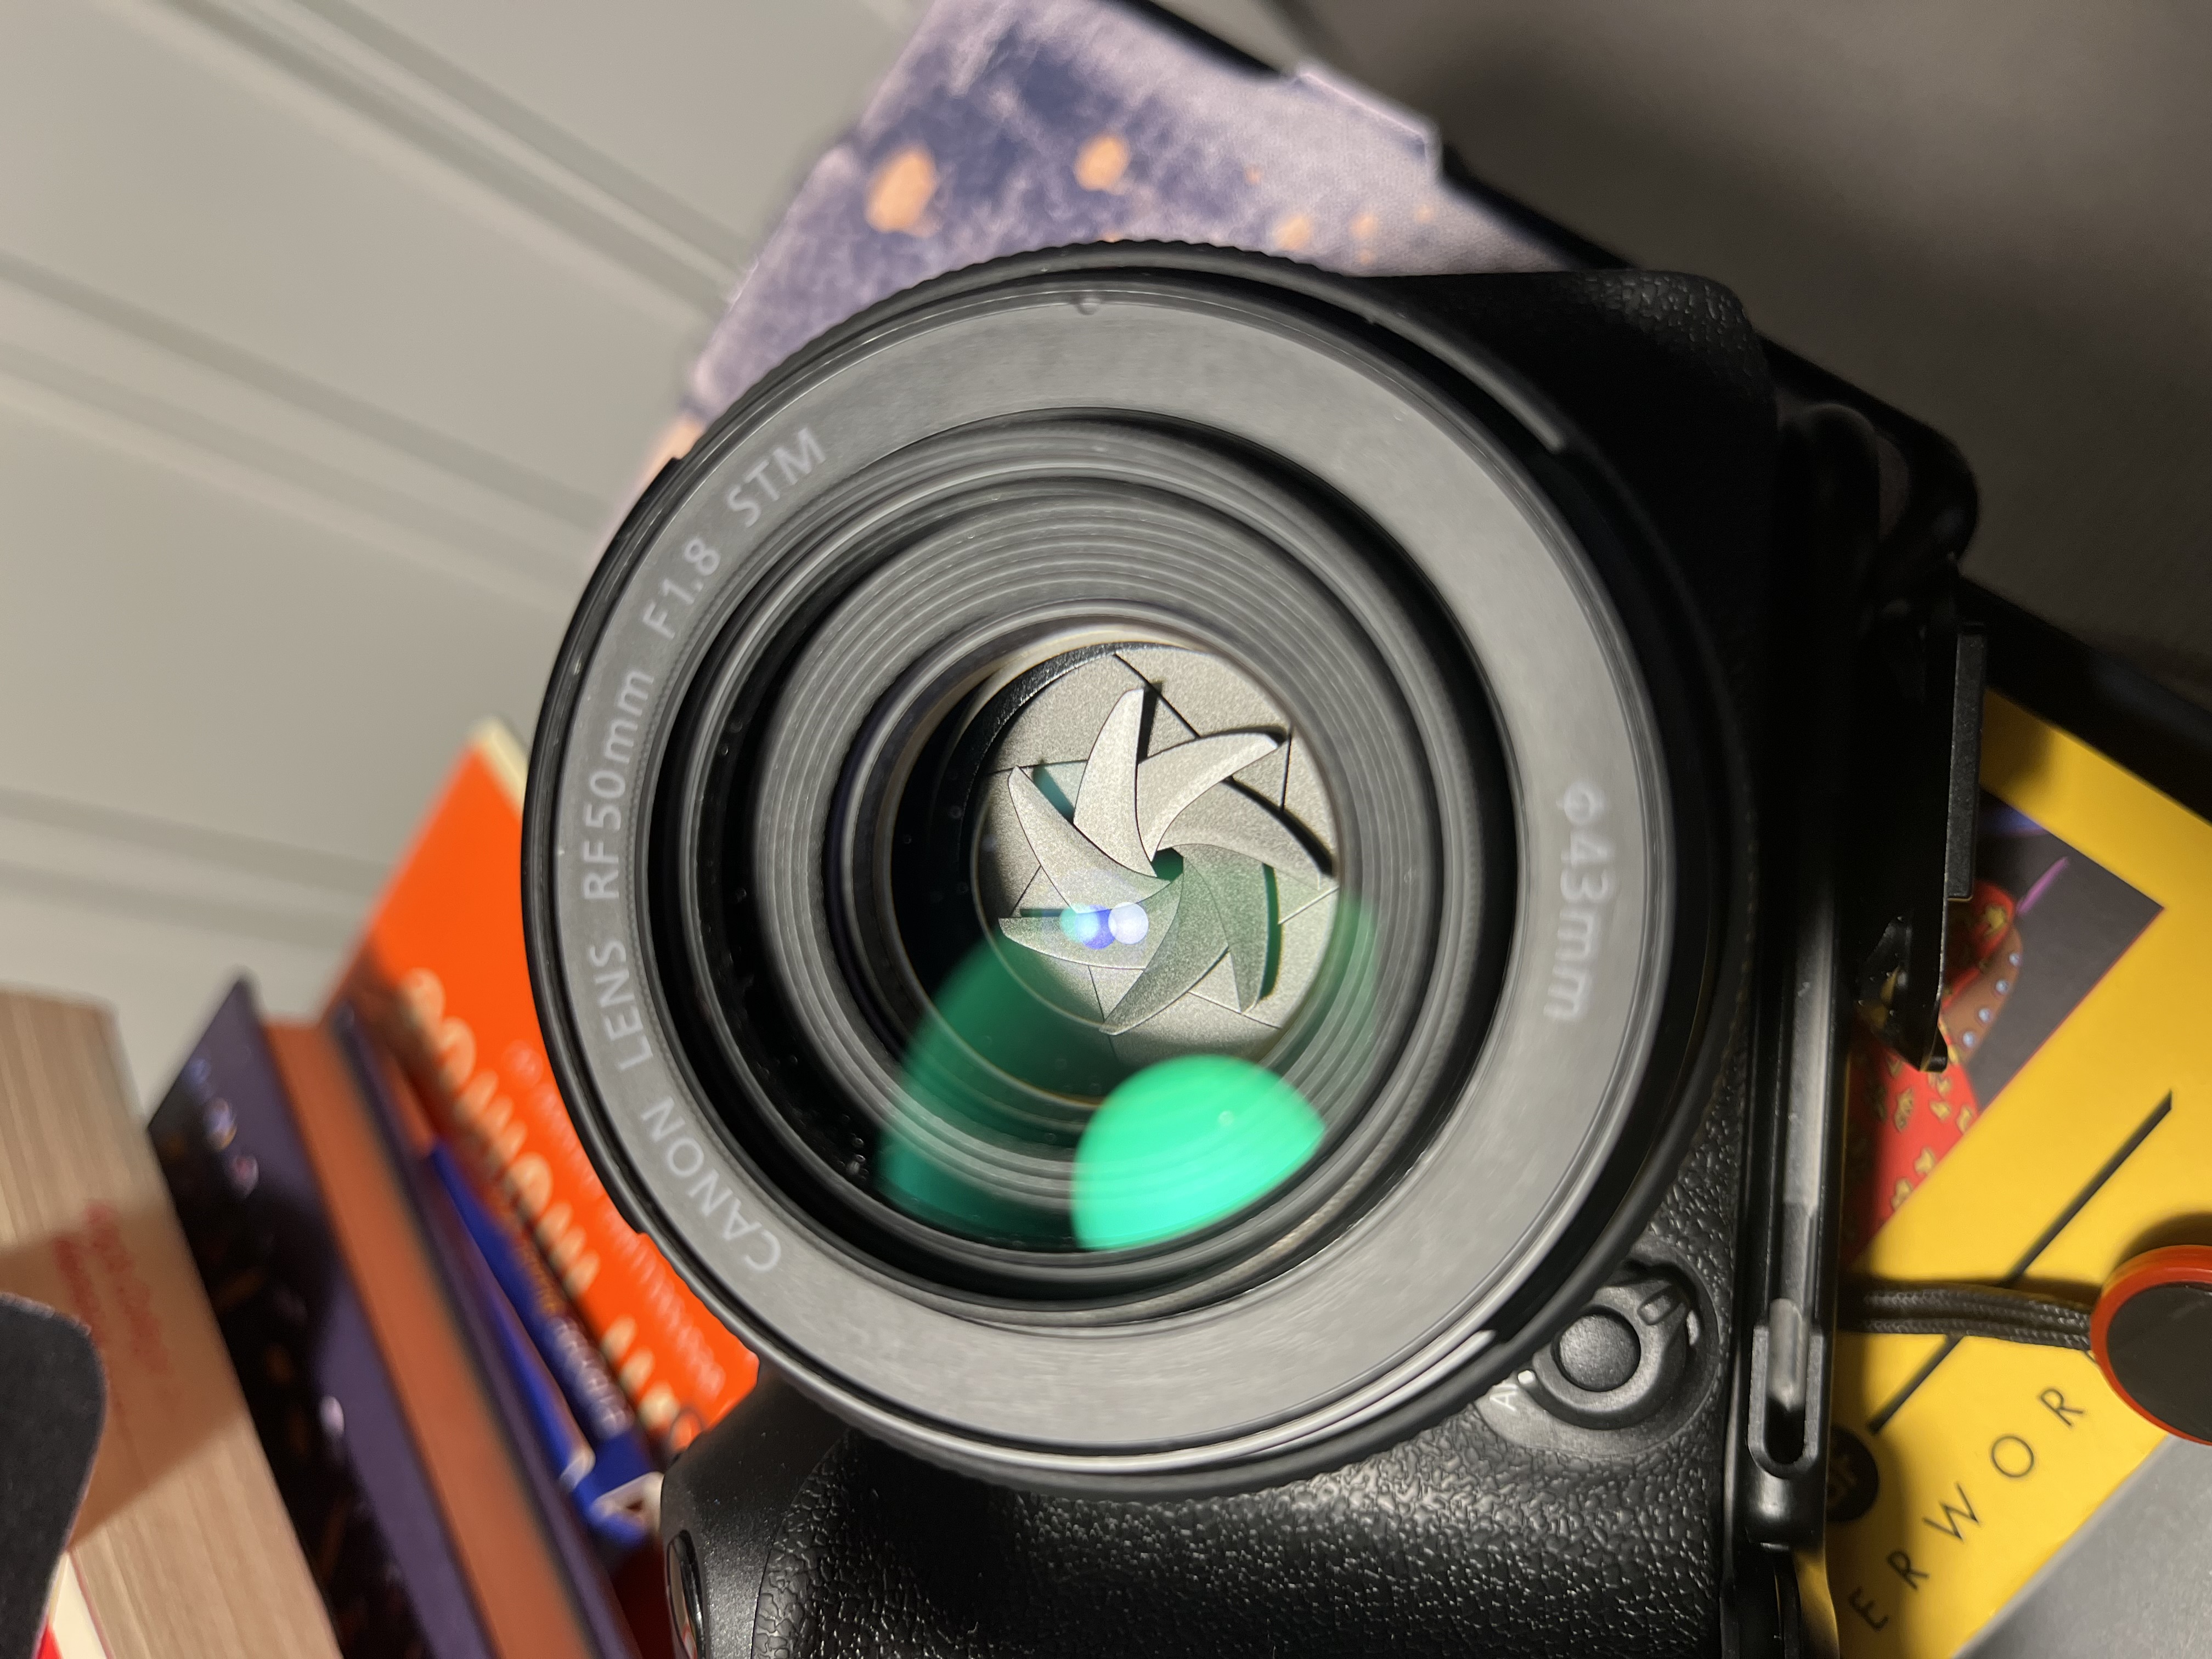
Common sense dictates that the a bigger hole would let in more light and here common sense is 100% correct. I have another two photos below (1/80, ISO 8000):

There’s also another effect at play here with the aperture which is far more subtle. A wide aperture makes for a far shallower focal plane. I can hear you already - Too much jargon Jack!, What does that mean?, Is that related to my glasses?. The answer to the third is actually yes! The focal plane represents where is in-focus for the image - if you’re in the focal plane then you’ll be lovely and sharp and if not then you’ll be blurred. A varifocal lens for a pair of glasses would just mean that you can have multiple focal planes with one lens3. A shallower focal plane means that more will be in blur, which is incredible for portraits but maybe less good for taking a big group photo. The farther away you are from the subject, the more this diminishes (eg. feel free to use F1.8 for landscapes), but for close subjects this can be an issue (above, you can see my cat’s back out of focus).
To provide an example of why I almost always stick to F1.8 for things like portraits, I’ll put a photo of myself below that a friend took:
Without that wide aperture we couldn’t have got that background blur4. The extra light also allowed me to put a relatively low ISO (leading to less digital noise, as you’ll learn in a second) and a lower shutter speed (to remove blur from shaky hands).
So to conclude, the tradeoff for increasing aperture is more light in exchange for a shallower focal plane.
ISO#
The nerdier amongst you may have recognised this acronym as being for the International Standards Organisation and quickly dismissed it for being unrelated to just photography - I’m here to tell you that this is the correct acronym expansion5. Why?? I have not the foggiest clue.
The ISO represents the sensitivity of the sensor - the higher the ISO, the brighter the photo! There isn’t anything mechanical about this - it’s just the sensor. See more photos (F4, 1/80):

At first glance, this seems to have no real effect but when you look closer at the high ISO photo, it seems off. If you zoom in sufficiently, you’ll also start to see that the pixels average out to a nicer colour, but individually are a mess. We call that digital noise and that is the tradeoff for ISO - more light but more noise at higher ISO.
Focal Length#
The focal length is like the zoom, but instead of cropping, we just choose to focus on different light rays. It is measured in mm for millimetres which approximately measures the distance between the front of the lens and the sensor6. A longer lens means more zoomed in.
Here are two example photos taken on my other lens (F6.3, 1/50, ISO 16000):

My other lens is the lens that came with my camera and goes from 15 to 180mm. As you can see, the light isn’t vastly changed by the focal length (except for an exception I’ll get into), but the main thing that is clearly changed is what photographers call Compression. In the 150mm photo, the cat and the beanbag look to be at about the same depth and that makes total sense - I took that photo from 3 or 4 metres away, and the cat is centimetres away from the beanbag. However, I took the other photo only centimetres from the cat’s nose so you can really clearly see the depth in the photo which makes his face pop.
Because of that compression, we also change the focal plane, which is how lots of people choose to simulate the same effects you get on a lower aperture. The reason you need to simulate those effects is the same reason that I almost never take my 18-150mm with me unless I’m going outside - you lose light with a cheap lens really easily. To buy both new, my 50mm and 18-150mm lenses are about the same price (if not, the zoom lens being more expensive) but my 50mm lens has a maximum aperture of F1.8 and the 18-150mm has a floating maximum aperture of F3.6 to F6.37. Whilst that doesn’t seem like a lot, aperture doesn’t increase as a continuous variable - it goes in stops which jump larger gaps as you get higher, which means that F3.6 is closer to F6.3 than to F1.8. This means that even if I can get more people in a photo with an 18mm lens, it’ll be a better quality photo (as I can use a higher aperture and so a lower ISO) with my 50mm lens. Since I normally shoot in manual mode, this also means that as I zoom in, the light available to the sensor decreases which means that I have to adjust two or three settings at once - not ideal, especially if I need to get a photo quickly in a crowded touristy area.
My prime lens is far cheaper and has a far higher maximum aperture because it is far easier for manufacturers to make prime lenses with fast (fast glass means a higher maximum aperture and vice versa), and so fast variable lenses are incredibly expensive.
Closing Thoughts#
I freaking love my camera - not only has it allowed me to capture some really precious moments, even in the time just since Christmas, it’s given me the perfect excuse to learn more about optics and physics and to deep dive into a field I knew I wanted to look at but had never had the opportunity to before.
Learning about all of the different settings has also allowed me to make interesting artistic choices, where I’d always just used the Automatic mode on cameras I’d borrowed before to make the photos perfect.
If you’re looking to get into photography, I can recommend the following youtube channels most:
- PetaPixel does a ton of reviews and roundups, and the host is really charismatic.
- Simon d’Entremont does a lot of more educational content, and is always incredibly concise and clear.
- Jared Polin does more week-to-week news as well as reviews as well as expeditions and things adjacent to photography. He can be a bit modern-youtube-shouty-and-clickbaity8, but I’d still 100% recommend.
This is intro to photography, not intro to Quantum Physics - we’ll leave it here for now, and probably for the foreseeable future. ↩︎
This is why some people call purple a fake colour - you get purple when you mix red and blue light, but technically the middle of red and blue is green in the electromagnetic spectrum. As far as I believe, purple has just as much a right as any other colour, because the part that actually matters to people is what we see. ALso - by that logic, white is a fake colour. ↩︎
The glass inside the camera shifts using motors to focus at different distances in case you were wondering - if you here some whirring as you focus the image, that’s what it is. ↩︎
Except maybe without focal length shenanigans - and I do mean shenanigans (put a pin in this for now though). ↩︎
English speaking peoples will be forever cursed with the limits of 3-letter acronyms - 17576 sounds like a lot of combinations until you realise it’s really not (just ask the ICAO 🤣). ↩︎
Approximately because of things like Crop Factor, internal zooming lenses and advances in lens technology from when the convention started. ↩︎
So here I took both photos at F6.3 to keep the light as similar as possible, whilst keeping the compression effects. ↩︎
I also can’t blame him at all for that - that’s the way the platform is going right now, and he’s the one who can afford to take $60k of photography gear on an expedition in Kenya. ↩︎